I’ve wanted one of those lovely Italian diadem headpieces for ages, and being made a Baroness in the SCA seemed like a perfect excuse to finally make one.  I decided to make my own, because Cesare was (is always) busy with many other things, like in this case making our actual coronets, and I didn’t want to put more on him.

Originally I was going to cobble something together with fabric and maybe leather, but it was simply not going to have the right look, At All.  Also the pattern which I found online for the shape, while it had good head shaping, was HUGE and silly.  The period ones are gold and gem-covered and not what you’d call modest, but they are at least kind of discreet in size.  So I came up with this, which seemed to be going to work:

Now, these diadems were all the rage in Florence, but I finally found one in Venice, thus justifying my desire for one. It’s in the right period (c. 1560) and it’s relatively simple in shape and design:

Girl with a Basket of Fruits (Lavinia), 1555 – 1558 – Titian 

I gave Cesare my pattern and he cut the metal – I was willing, but I imagine he was pricing out the saw blades I was likely to break and decided he’d better do it himself.  He also bent and twisted it slightly to fit my head – fabric or leather wouldn’t have to be shaped like that, but of course metal does.  The metal is just an old chunk of aluminum – it polishes up to a nice silver, and is of course very light and easy to work.

I then (all by myself!) drilled holes along the outside edge to put on a border.

The border is also something Cesare made, leftover from another project, it’s a ‘simple’ hammered wire braid, which I attached with little loops of wire at regular intervals.

Then I had to drill LOTS more holes to put all the pearls on.  They are all beads, and all held on by twists of wire on the back.  Usually there is one central large gem and they get progressively smaller towards the sides, but I needed six, so I put a seahorse in the centre to represent my badge, six large carnelians on either side, interspersed with tiny pearls that are just there to make it fancy.

Before putting the pearls on I had to make it shiny.  First there was a LOT of sanding, with increasingly fine sandpaper.  Then Cesare gave me a buffing compound of some kind, which turns black when you rub it on, then you polish it all off and scrub the thing with toothpaste, after all of which it is pretty darn shiny!  (I think the polishing compound is Mother’s, it is found in the automotive section!)

Here is the back, once all the pearls are in place:

I glued a piece of leather on the back once it was all finished, so the wire twists would be hidden, and more importantly wouldn’t tangle in my hair!

And here is the finished Rigid Thing!  I wore it all day on Saturday and it was perfectly comfortable, couldn’t really feel it at all, and it stayed in place quite well.  Further testing will be conducted at events where I am not just sitting at my computer, but initial results look promising!

It started because Veronica Franco was a loudmouth.

Don’t get me wrong; she had reasons. She was an estimable woman. But she was a woman, and a loudmouth, in a time when both were questionable behaviour, especially in conjunction, and she made enemies. And one of them, a big jerk named Maffio Venier, got into a poetic argument with her that in his case, at least, rapidly descended into ad hominem argument and insult. He called her a “monster”, made of “chalk, cardboard, and wood” – references to the “falsity” of women’s appearances. Chalk was the makeup used to cover imperfection. Wood referred to the pianelle or chopines, tall wooden shoes that women wore, ostensibly to protect their slippers, but really, these things were extreme.

Anyway, that all made sense. But what was the cardboard? It pretty much had to refer to the bodice, which in the period was stiff and slightly constricting and smooth.

Which was interesting because Venetian women didn’t wear corsets, as a rule, until very late. Corsets were believed to cause abortions, which was a mortal sin, so married women especially eschewed them (they were forbidden by sumptuary law for the same reason, but the mortal sin thing was real incentive to actually follow the law in this case). So they wore open front bodices under which a corset would have shown, proving that they weren’t wearing one.

But fashion is fashion, and in this case the fashion was for a smooth, stiff, constricted bodice. I had spent literal years experimenting with materials that would give the right look and still be practical (and legal, and not damn my soul to perdition!) and although I got some nice-looking results, I was not in any way convinced that they were period results. They had the look, but they weren’t right. And because I am me, that wasn’t good enough.

So I started looking at cardboard. At first, I was distracted by some experiments people were doing with glue-soaked linen. They had come to the same stiffened bodice conclusions I had, from another angle – there are pictures of dresses lying on the ground with nobody in them, but they retain their shape stiffly.

Being seamstresses, it was not unusual that these people looked for fabric solutions – clothes are made of fabric, right? But that word, cardboard, kept haunting me. And glue soaked linen, while very strong, is still flexible, and it wrinkles and bends when you heat it (like by wearing it on a hot day) and you have to heat it again to get it back flat.

I looked up Maffio’s word, cartone, and it just means cardboard. Pasteboard. It always has, even in the Latin, it is always stiffened paper. The earliest use of it they are pretty sure was stiffened papyrus, and it is never used to indicate linen. And we know they used cardboard and paper to stiffen collars and such, so is it really such a stretch for a period tailor to use it in a bodice? Increasingly not, I began to think.

So I got my hands on some heavy cardboard from a friend, and got to cutting. It’s a highly compressed pasteboard, maybe the thickness of a quarter, very like the back of a sketchbook. I used it as my base layer, pad-stitched it to some wool to soften the line and give it some shape. I made the straps out of a couple of layers of linen, not cardboard, and then covered the whole mess with my face fabric and lined it.

It does the right thing – when you leave it lying around it maintains its shape just like in the pic above, and it is very smooth and snug to wear, and doesn’t shift around. I wore it for the first time yesterday, all day, and it was generally pretty comfortable. I think in future versions (of course there will be future versions) I will trim the cardboard back further from the armscy, where it was a bit pinchy, and ease up on the layers in the strap itself. I found it bulky in a way it doesn’t need to be.

I also wonder whether the cardboard back is necessary – it doesn’t really add anything I don’t think, and it makes the garment more difficult to store. Storage is one of the things I am pondering – upper class women had a lot of clothes, and didn’t use hangars, they used chests, and this dress -although it matches the dress in that painting above- would store badly in a chest, it would take up too much space! I could lighten up the cardboard itself, but it still couldn’t be squashed, it would fold. So I’m going to try the next one with cardboard just in the fronts and around the side – to where the side back seams are – and see how that affects it.

Yesterday, one of my dearest, oldest friends was elevated to the Order of the Laurel. For you non-SCA folks, that is the highest honour on can achieve in the arts, and it ups one’s ‘rank’ in the society to a Peerage. So it is really a big deal. One of the things you get, in our Kingdom anyway, is a coat or cloak with the badge of the order worked into it to show off your new position, and Emer asked me to make her a coat for the occasion.

Now, Emer is a bit of a rockstar. She writes amazing, powerful music and performs it beautifully. You may know some of her songs and not even realize it – Heather Dale has sung Emer’s music, and there is even a funny story about a church choir that was singing one of her songs and thought it actually was traditional music. She is an Irish bard, and when the “bard spirit” comes upon her it is breathtaking. She is a powerful force, and a beautiful person.

So I had to make a coat worthy of this amazing woman! We went for a Viking style coat, because they are warm and practical, but also because (much to Emer’s constant annoyance) there is VERY little historical record of what the ancient Irish wore. We know they had tunics, we know they had black wool, we know they wore clothes but there is nothing extant and very little written about those things. A Brat, while cool, wasn’t going to be as versatile as a coat, nor did it lend itself to laurel heraldry. So we chose the coat, but I knew I wanted to “Irish it up” as much as I could to suit her persona.

That meant embroidery. In The Tain, there is a section where all the Chieftains and their men are coming to join for battle, and the poet actually breaks the narrative and spends three pages describing the colours and embroidery on their tunics. So obviously smearing embroidery all over the thing was the way to go to show Emer’s rank and privilege.

Em’s heraldry is foxes, red and white. So I designed a knot-work motif of tangled foxes, wrapped around a laurel wreath, and put that around the hem. That was the big job, and I think it turned out well. Then I put some bands of embroidery down the fronts and on the sleeves, both to fill the space and to evoke the armbands and jewellery she’d be wearing underneath. Her partner provided a gorgeous wool twill for the project, and another friend dyed silk for me to work with. (Embroidery with silk does not suck as much as embroidery with cotton! I learned a thing!)

I did blanket-stitching around all the edges with white silk over a red cord, and then we capped the whole deal by adding a fox-fur collar and cuff-linings that had been salvaged off an old fur coat. The end result is a (warm!) coat that I think really speaks of Emer and her personality – and will look great beside a campfire on a chilly evening!

So in the course of doing something else entirely last night, I happened upon a large number of large mushrooms in my driveway. I apologize for not taking pictures of them, I was very excited. I immediately chopped them up and threw them in a pot.

I kinda like picking mushrooms (I know, it’s weird, but I do), but there aren’t many edible ones around here, which has always made it less fun. But these were so luscious, and had such a lovely silver shine on them, they had to be good for something! So I dyed yarn with them.

I’ve never dyed with fungi before, and I had no idea what these were or what colour I might get, but I had to try. And to my delight, I got a colour! Well, sort of. It’s a grey. But it’s a really nice grey, which I like way better than the yellows and browns that grow naturally in plant matter around here. Grey I can use!

So. Rando mushroom, iron mordant, pretty grey. If I get any more of these ‘shrooms, I will take a picture, promise. They’re pretty distinctive.

Wool on the left, and a bit of silk on the right. The silk has a lovely blue tone to it! There’s too much light in this pic. 😦 I’ll take a better one when they’re dry.

<later>

That up there is the silk, and here is the wool:

Got Cesare to take some pictures of me this morning so you can actually see the durned thing:

I’ve been trimming a gown. It is appliqued velvet with embroidery, and it is taking forever. Moda a Firenze tells us that in period the trim would be embroidered by the length and then applied to the dress during construction. That is very quick and practical, but my household has no embroiderer on call – we only have me, and I am no embroiderer. So I’m just doing it on the dress.

I really don’t like embroidery. I’m not very good at it, and it takes forever. I do however enjoy Things That Are Embroidered, so every now and then I have to suck it up and break out the threads.

That’s not what I came here to tell you, though. To give myself a break from the endless Leaves and Flower-Things, I’ve been making some modern clothes, because well, I need some clothes. I’ve made a couple of dresses, and I’ve got a skirt on the go (although that is taking as long as the embroidery and for similar reasons) but I found this chunk of fabric the other day and what it wanted to be was a lightweight corset. A startlingly bright, Hawaiian print corset-top thing.

Now, I’ve had a top like what I was envisioning before, but it was a store-bought thing back in the 90s, not made for me, and it didn’t have good support and it shifted around, and while it looked ok I guess, it wasn’t anything to write home about. I figured I couldn’t do any worse than that, anyway. So I cleared off my table and drafted a pair of bodies, early 17th/late 16th century insert-corset-here.

The interior fabric is actually a heavy duty knit that I picked up somewhere, but there isn’t much room for stretch as the outer shell is this light quilting cotton. The bones (which are zip ties) are sheathed in bias binding which is sewn through both layers. I dithered about that, but decided I’d rather see the stitching than risk having the fabric go all puckery.

I made up the Order of Operations as I went along, and it didn’t go too badly – there are some things I will do differently on the next one (there will be a next one) and there are some things I probably could have done more neatly by hand – I used the machine for most of it. I’m still getting used to the new machine, and I’ve been hand-sewing everything for more than two years now, so I’m rusty anyway. But generally I’m happy. Used about a metre of this cotton, including binding and lining the back.

And then I got the zipper in, and was able to try the thing on. I am over the moon! It fits like a glove, it supports and doesn’t pinch and it isn’t shifting at all. If I could do handstands, which I most definitely cannot, I could probably do one while wearing it! I was gonna put it on my dressform to show you, but alas my dress form isn’t me-shaped enough for corsetry, so you get me in bike pants instead. Sorry.

Now I think I know what I’m gonna do with that yellow tiger-print cord…

I’ve been feeling badly that I haven’t posted a finished picture of the Entari gown and the kaftan roba.

The reason is, I’m not done yet. Why, you ask, reasonably, has it taken me six months or more to make a simple square-construction outfit? Well, in fact the outfit was made right away, took only a few days – heck, only a few hours to construct. Even with all the buttons on the gown, it was pretty quick. But then I needed to make the roba pretty. I started couching gold thread, but it was just too delicate on the big brocade, and I decided I needed something with more body. A nice wide bobbin lace would be just the thing, I thought.

Except my skill with bobbin lace was adequate, at best. I’ve done a few narrow tapes for edging shirts, but nothing very complicated, and my few attempts to try more complex laces – did not go well. So first I had to practice (hell, learn) working with many bobbins. I started with a simple insert lace for a chemise, then a slightly wider lace for the neckline. That went not too badly. I did an edging for a partlet that went really well, looked just like the picture. Emboldened, I went on to make a crazy amount of tape for a cloak for my husband, which turned out very well indeed, I am proud to say:

So finally I felt confident enough to tackle the pattern I wanted. And I worked on it. And worked on it. And I’m still working on it. It is coming out pretty well, and more importantly at this point it is almost finished. I have almost ten feet as of this morning; I need ten and a half. Maybe just a titch more, so I can centre it properly. The end is nigh!

The patterns I’ve been using are from Le Pompe II, published in 1562(?) and generously available online here.

Here is my lace so far:

Soon, my pretties! Soon!

Went with a dirt simple shape for this one, it hasn’t even got shoulder seams. Many do, but not all, and I didn’t want the seams interfering with the (very simple) embroidery:

It is based of this one, which is late 16th century but Spanish. Again, a very simple shape. As you can see I’ve altered the neckline slightly, as the Italian ones tend to have a V-shaped neckline, especially mid-century.

I’ve also left it completely open in front, I will add ties to fasten it, but that leaves me the option of opening it very wide. Paintings show them either way, if closed the lace goes all the way around the edge of the neckline and sticks up over the chemise lace.

The collar is tightly gathered, which gives it stiffness not requiring starch. You can smock it prettily on the inside and/or the outside, I figured decorative stitching would just distract, so I’ve got white linen smocking just to hold the pleats on the inner neck. I applied the lace before gathering, so it would be gathered too, but the lace going down the front of the collar and neck will be flat.

Today I’ve soaked off the stabilizer so the partlet is hanging to dry while I finish making the lace. The lace is bobbin lace from Le Pompe Opera Nova 1557 I picked it because it has a pattern that I thought matched the stars, it’s very pointy.

I’ve made seven feet of lace so far, it’ll probably take about ten to finish all the edges.

I’ve cut and am hemming a partlet. Partlets are lots more than just a scarf at the neck. Going through paintings I found three or four cut variations and about four collar variations as well, which if you could do math like I can’t means x number of possible styles, just by varying the cut – then they’re decorated in unique ways, which makes the possibilities almost endless.

In Venice they are usually sheer fabric or net; although I did find a couple of solid ones, it clearly wasn’t the norm. Lots or stripes or checks, which usually had embroidery or lace or pearls or all of the above over top. Basically a really good, relatively quick hand project where you can show off your creativity, and then use it to change up and finish off an outfit. Also you can afford to use really nice expensive fabric because they’re small, yet they’re not so small (especially framed by huge Venetian necklines) that you can really showcase your embroidery or whatever.

They almost all have a standing collar, although sometimes it’s just a tiny one at the back. Usually the fabric for the collar seems to be gathered and stitched, which would make it stiffer and more prone to support whatever lace or ruffle one puts on it. It looks like mostly the collar itself would not need to be starched, although the lace in some cases would be. That would also be more comfortable than a stiff, starched ring around the back of one’s neck!

I’m using the shawl part of a linen sari for my base fabric, and I’m going to <sigh> embroider over it. Not an embroidery fan, me, nor am I very good at it, but it’ll be a simple pattern. I found this pic, which has stars all over it:

The symbol of my Crucible award in the SCA is a seven-pointed star, so I’m going to use that. But because I like sewing and lace better than embroidery, it will also have a little collar and some lace.

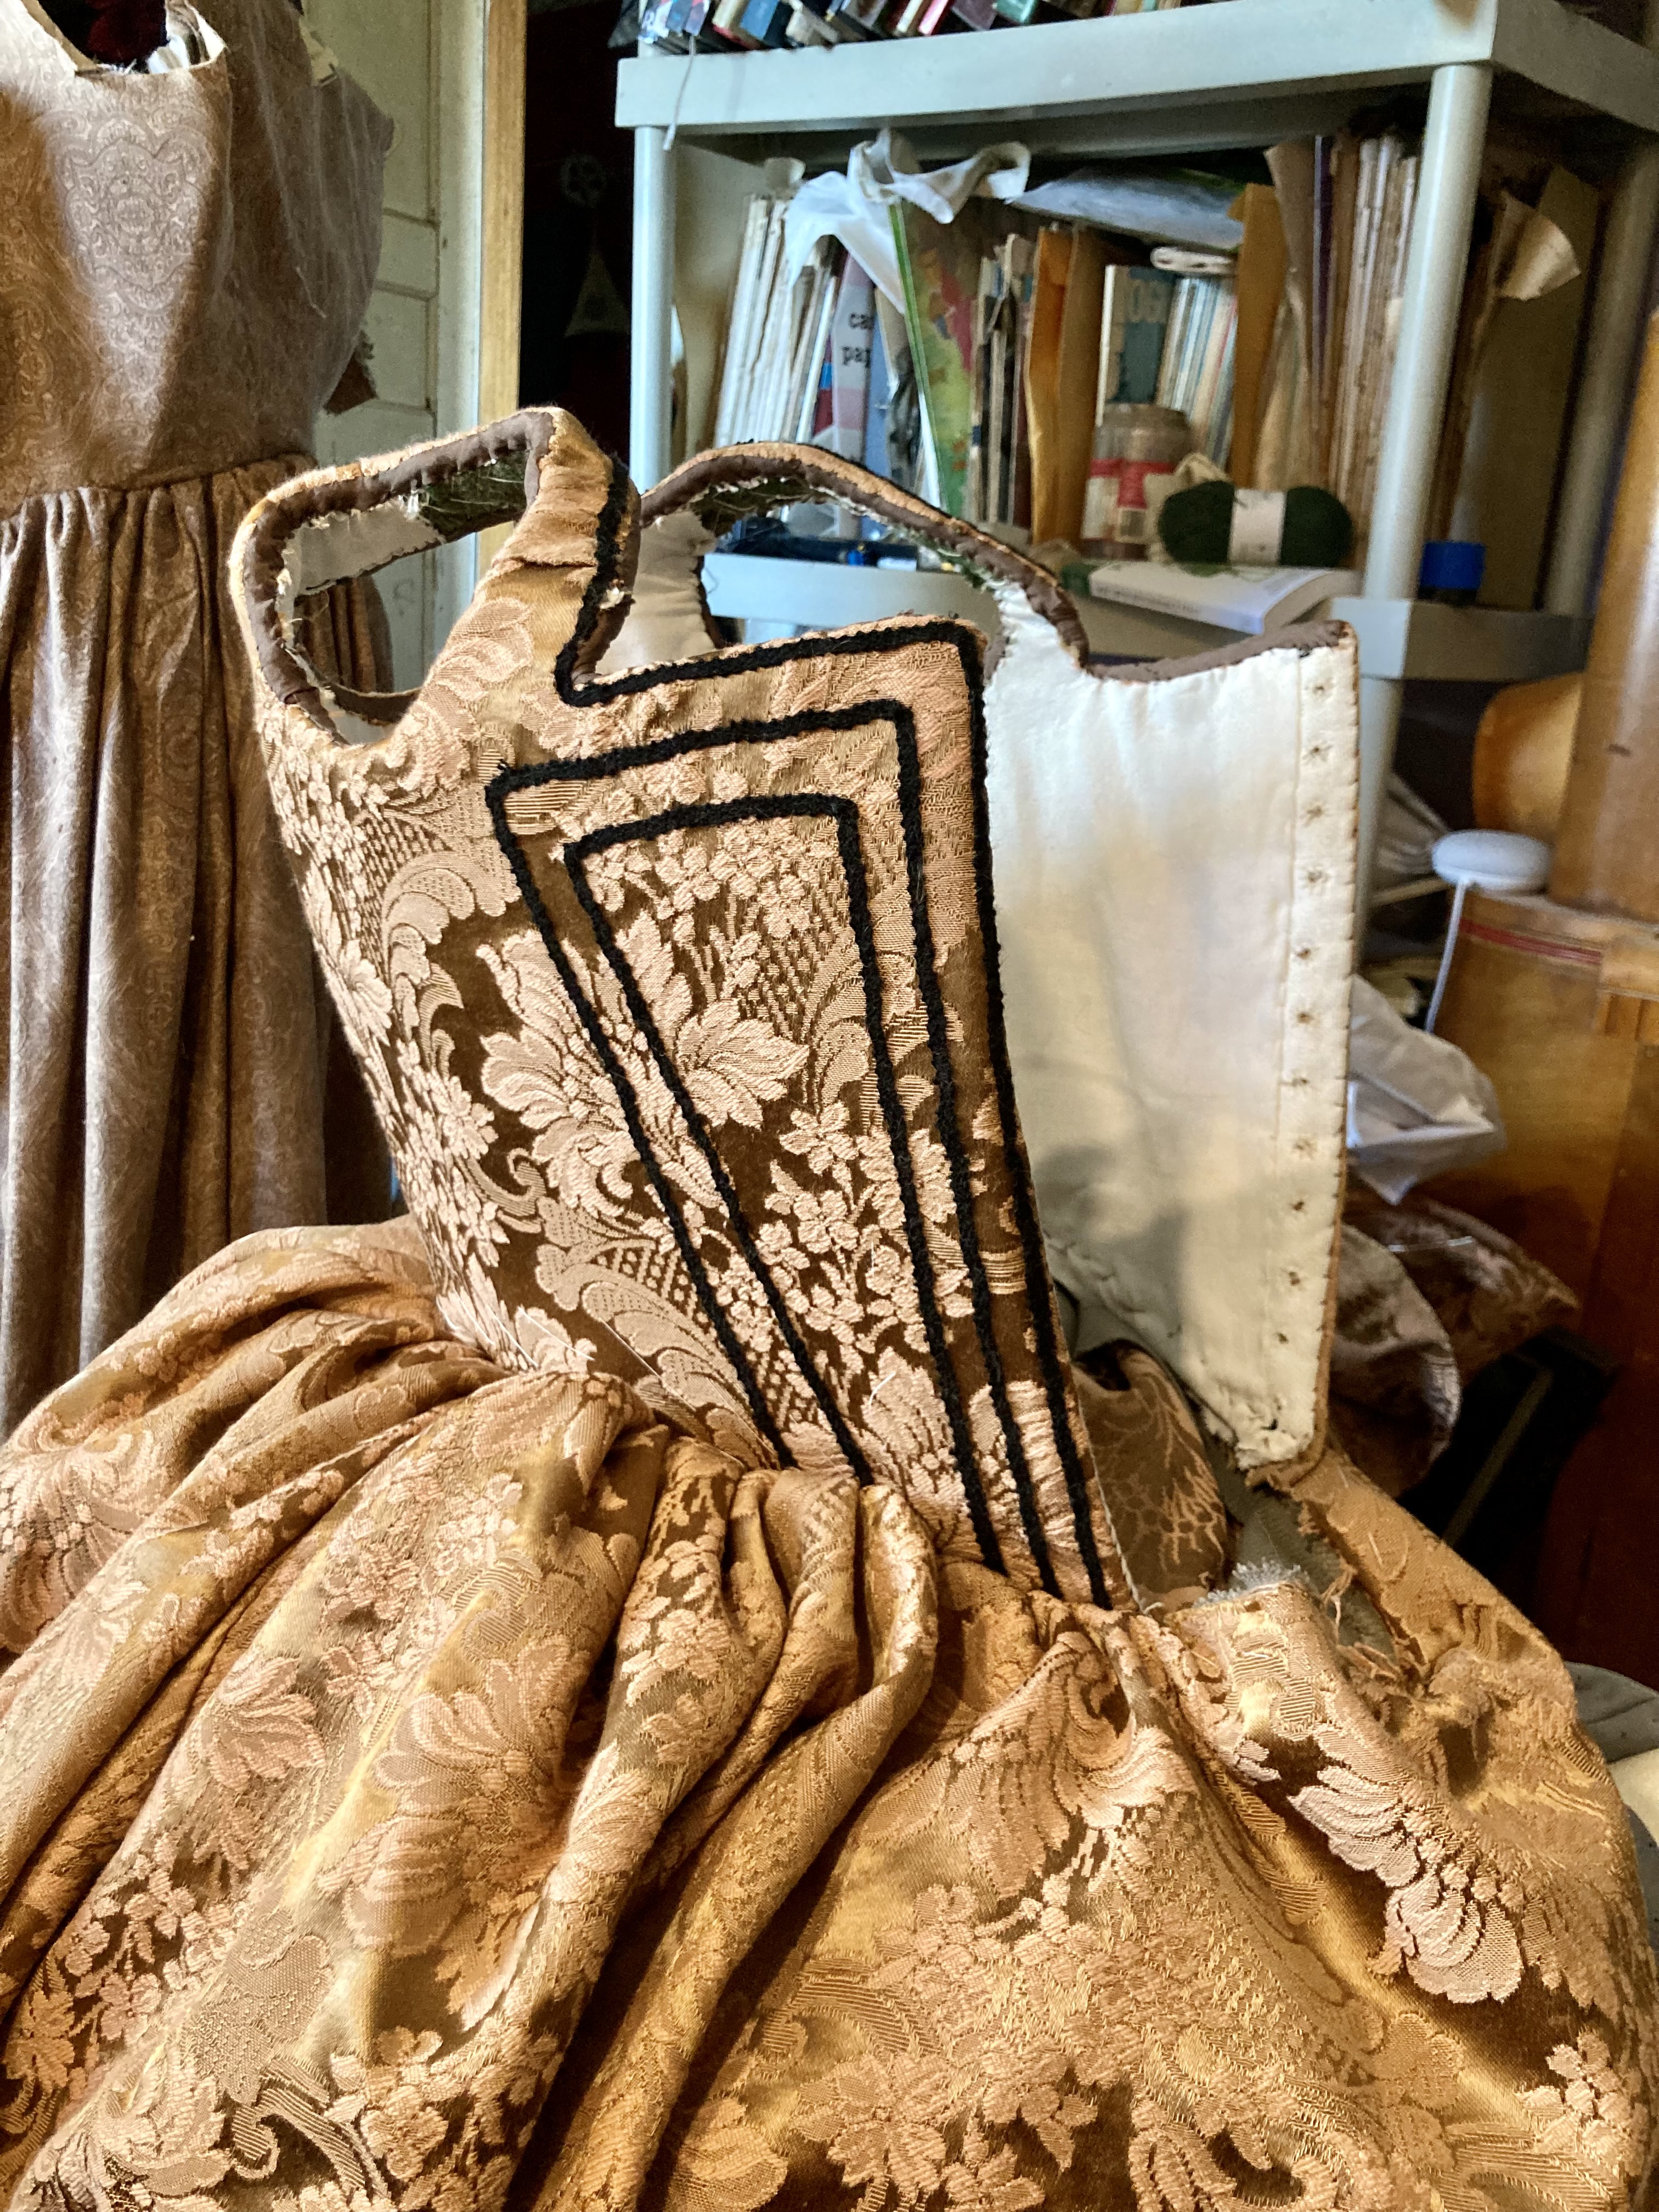
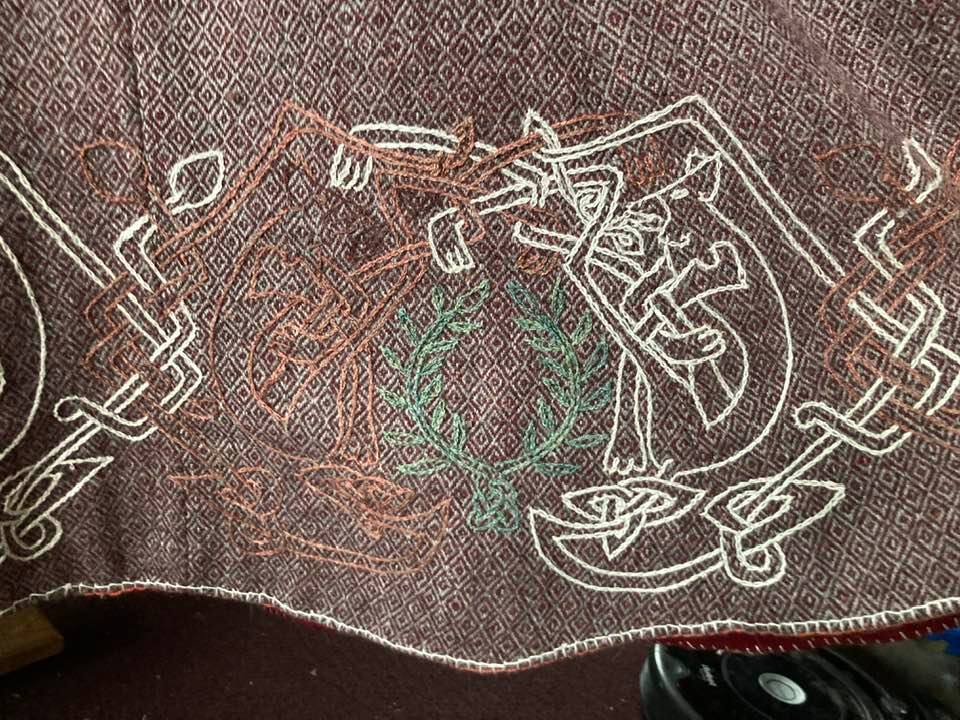
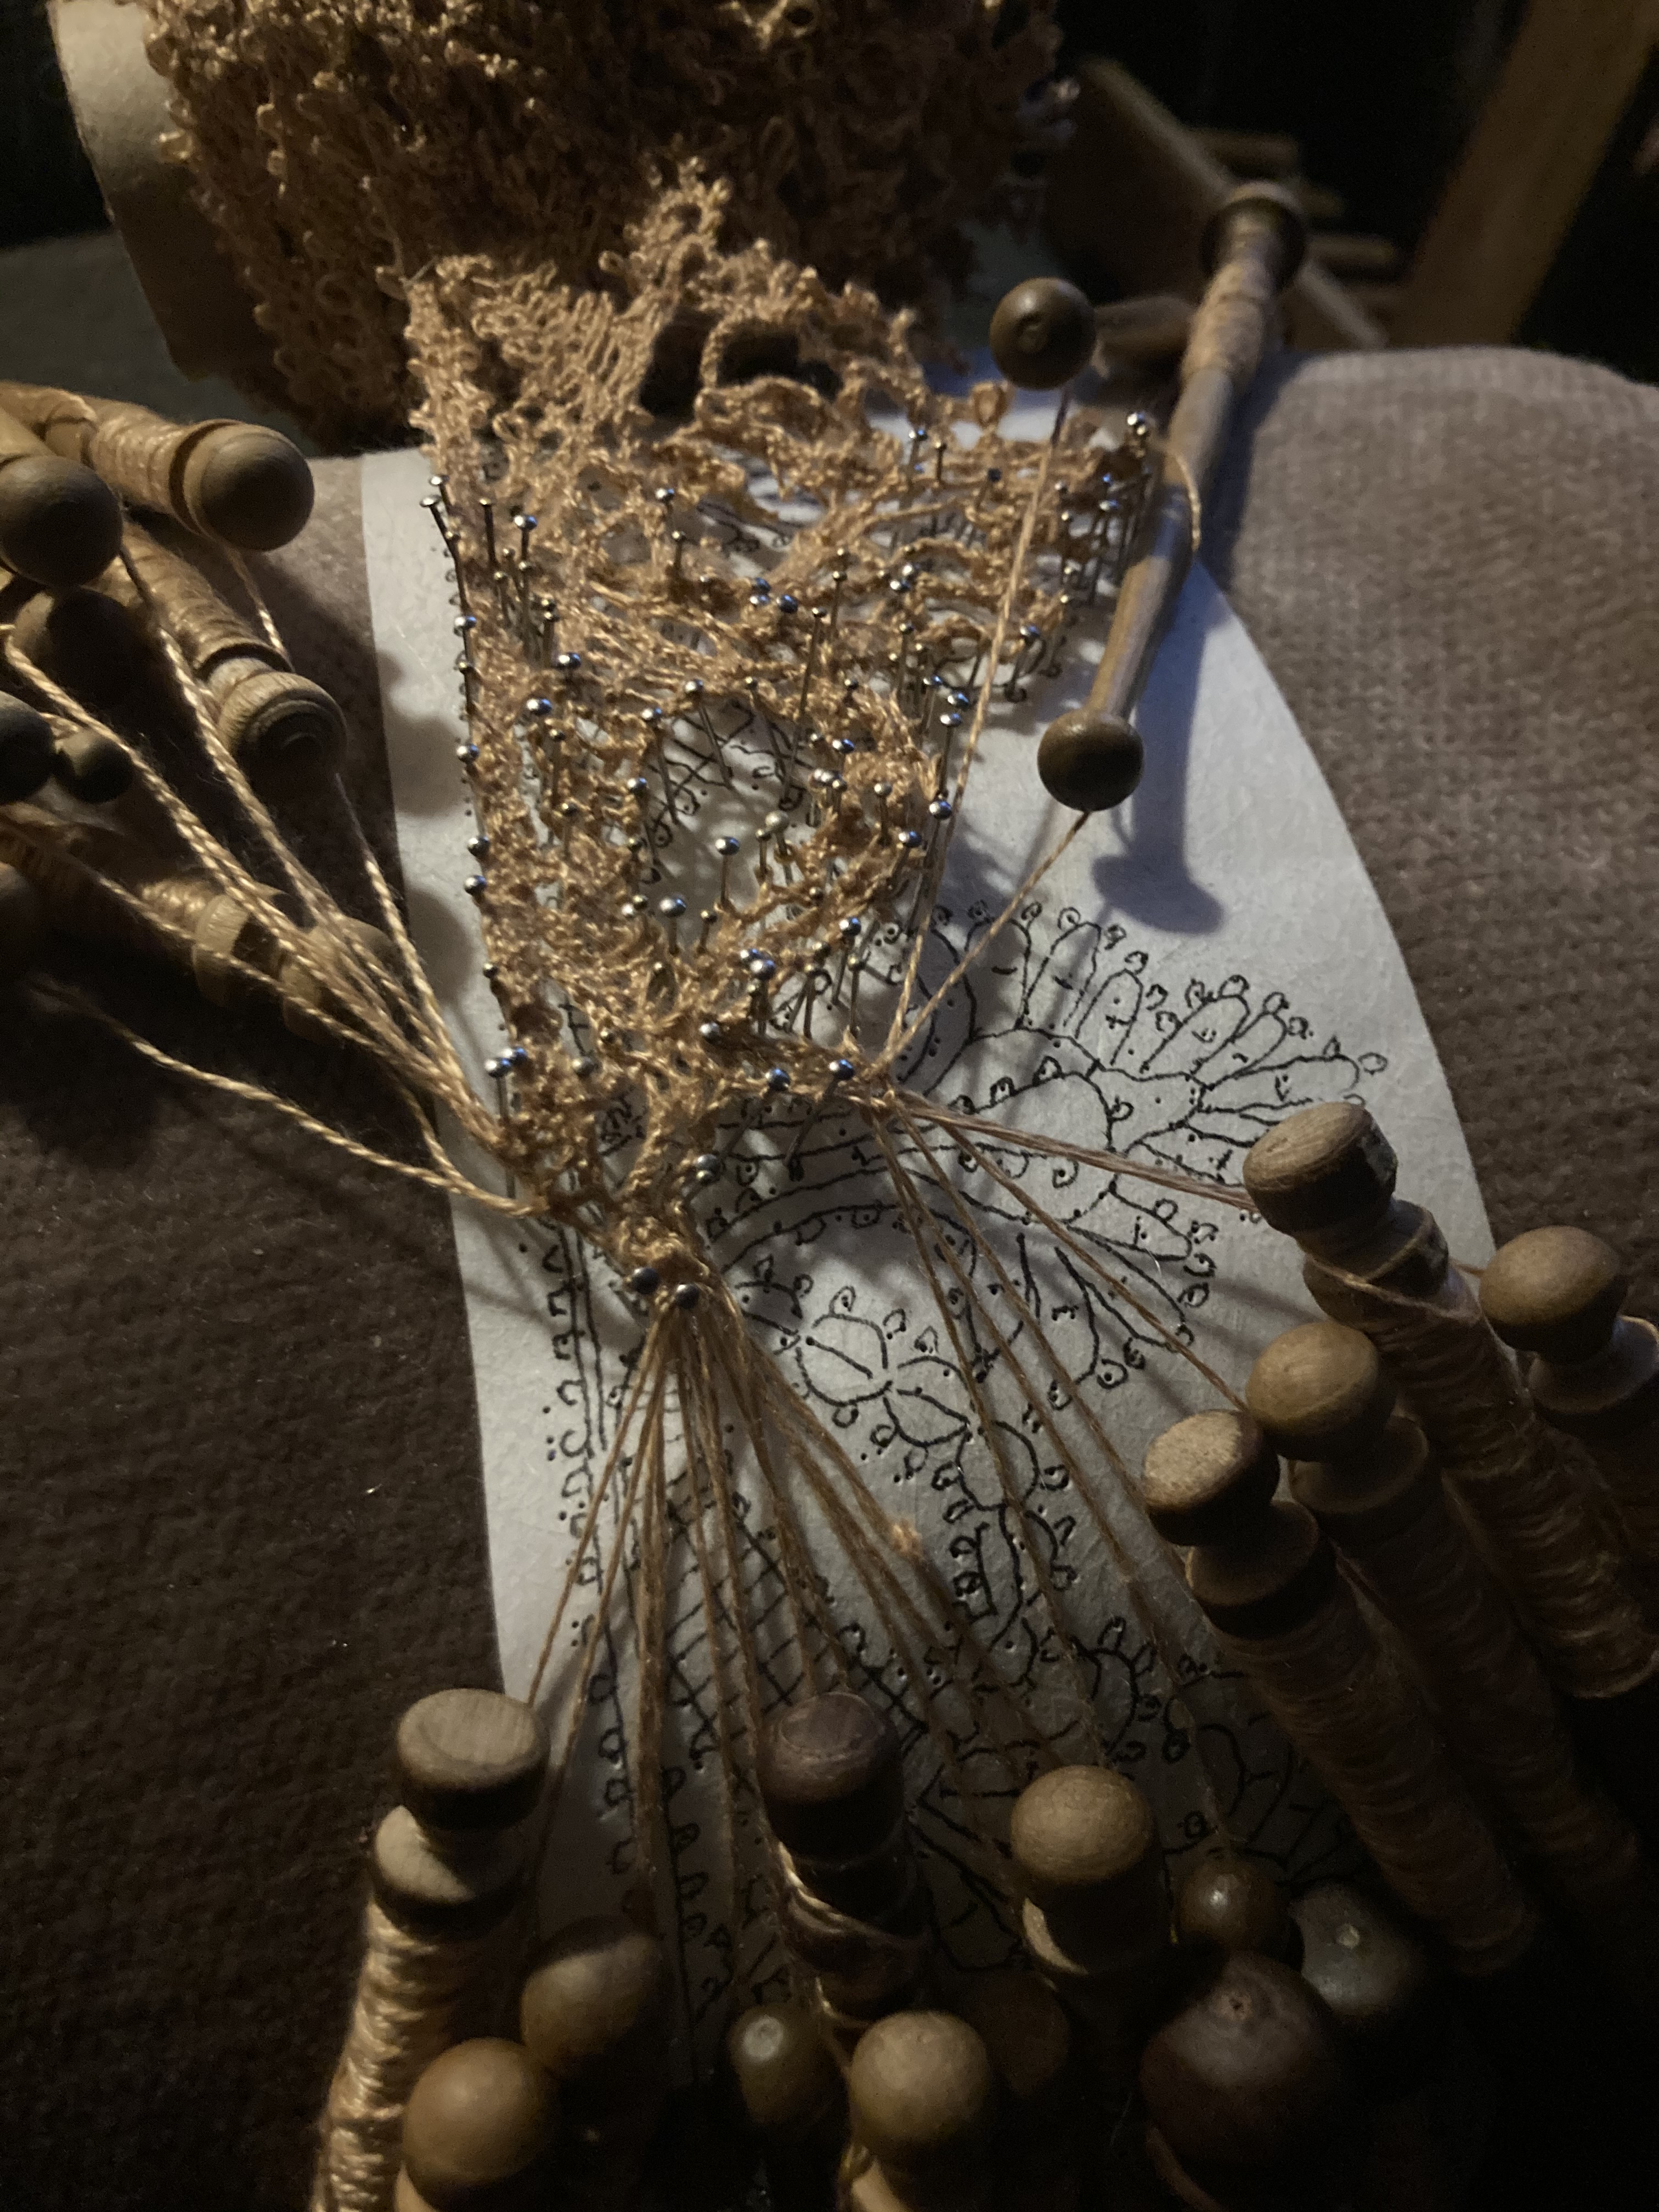
The entari-gown (entari is the right word) is cut and hanging out so the hem can relax, and I’ve been making buttons for it.  Not sure how many I need yet, but lots.

One of the common differences between a well-made period-costume and an extant piece (or what you see in a painting for that matter) is that modern sewers often don’t use enough buttons.  If they’re using metal buttons, that jives, because metal buttons were (and are) expensive.  But usually what you see on doublets, and on the significantly fewer women’s garments that have buttons, are thread buttons.  That is, a wooden bead covered in silk thread.  Those buttons cost almost nothing but labor, and labor was cheap.  So, rather than being obviously utilitarian closures, the buttons were part of the embellishment on the piece.  In fact there are often extra buttons just hanging out on shoulders, where there is no need for a button to be, except it looks pretty.  And so, as with other embellishment, there tended to be a LOT of them.  Like, a lot.buttons1

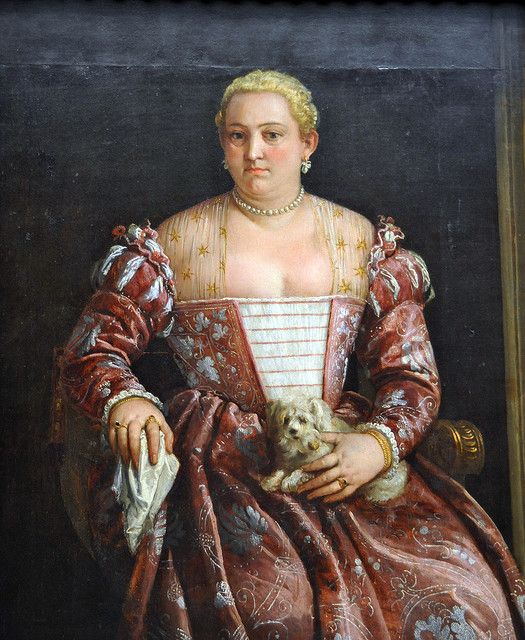
More than five.  There’s fifteen visible buttons in this painting, and this is a conservative doublet with large buttons.  Check out this extant piece at the V&A:

buttons2

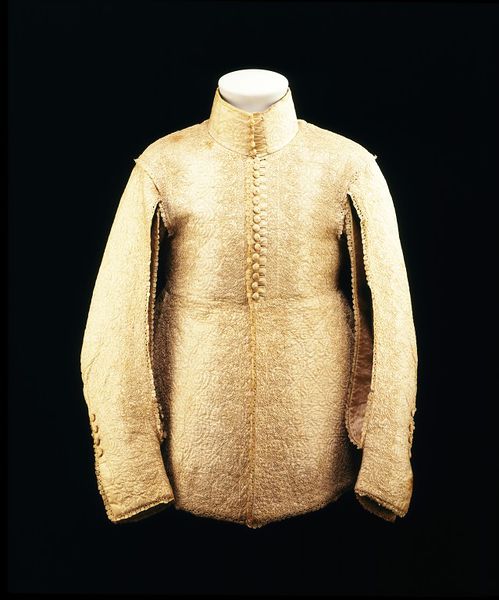
’bout 30 on this one, counting the sleeves, and it’s got a high waist!

I’m currently button-training Cesare.  The first doublet I made him had eleven buttons, but I’ve got him up to seventeen now.  I’m hoping to peak out around twenty-seven, if he doesn’t go into full revolt before then!

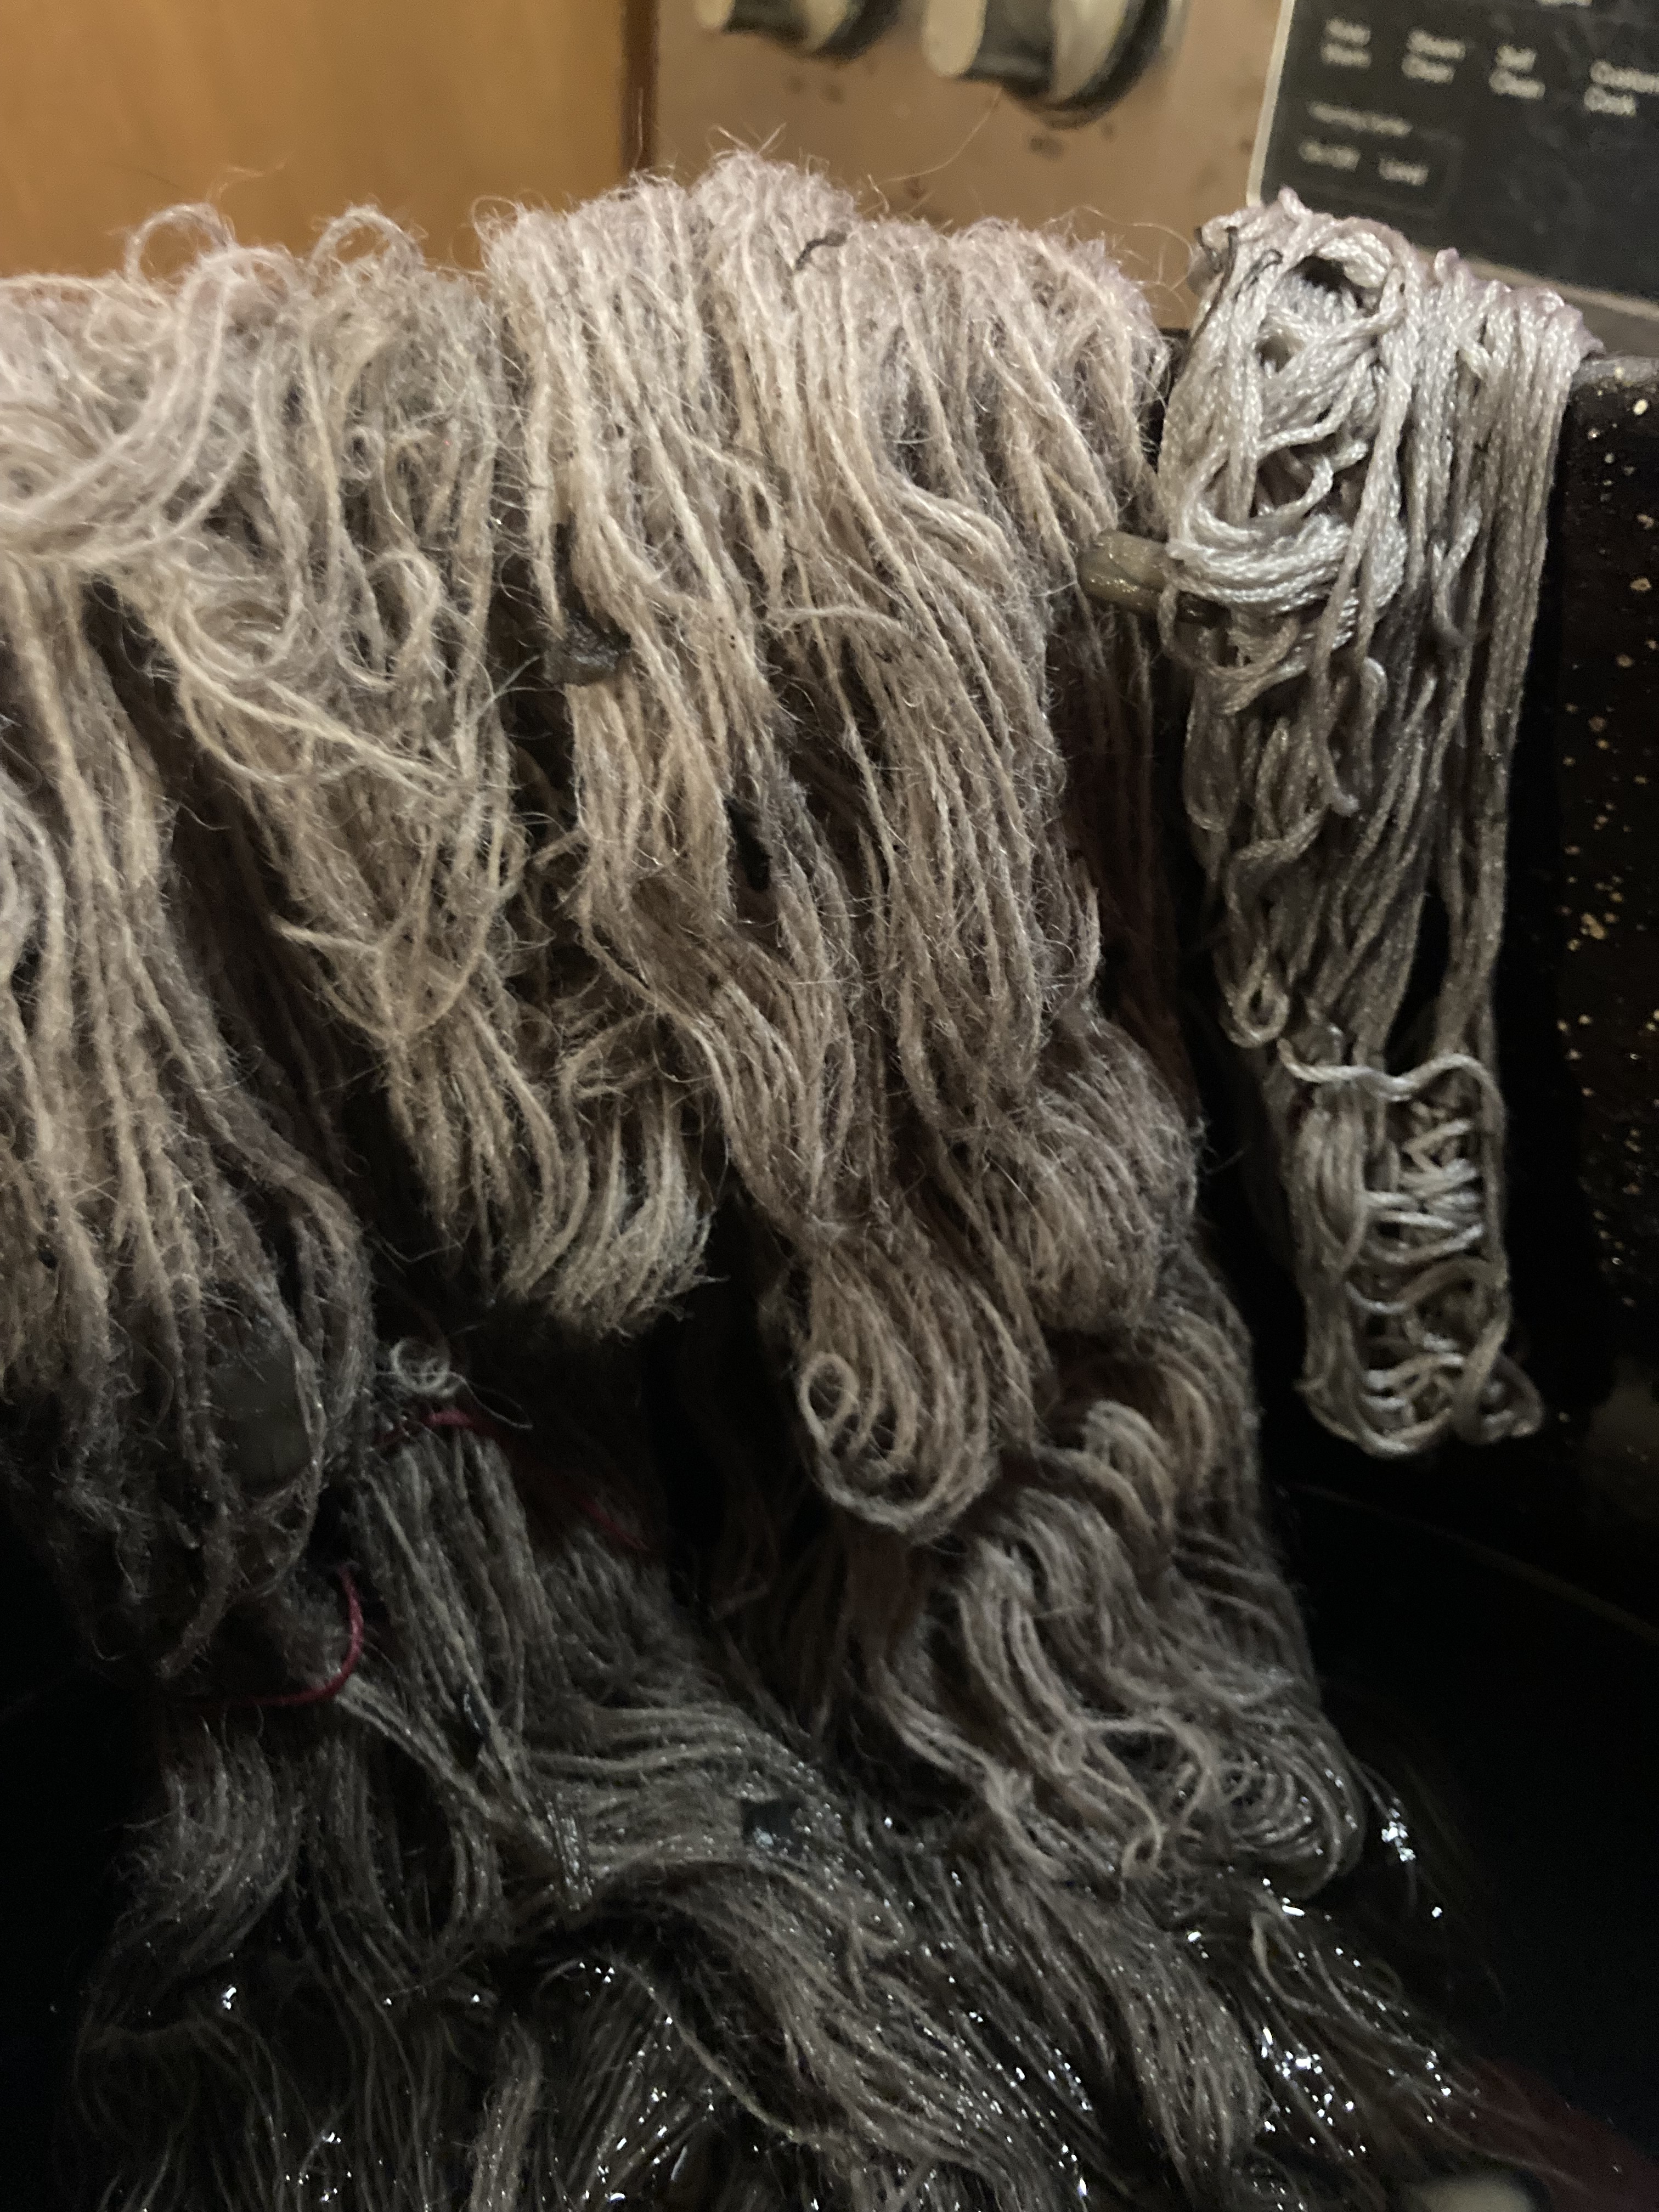
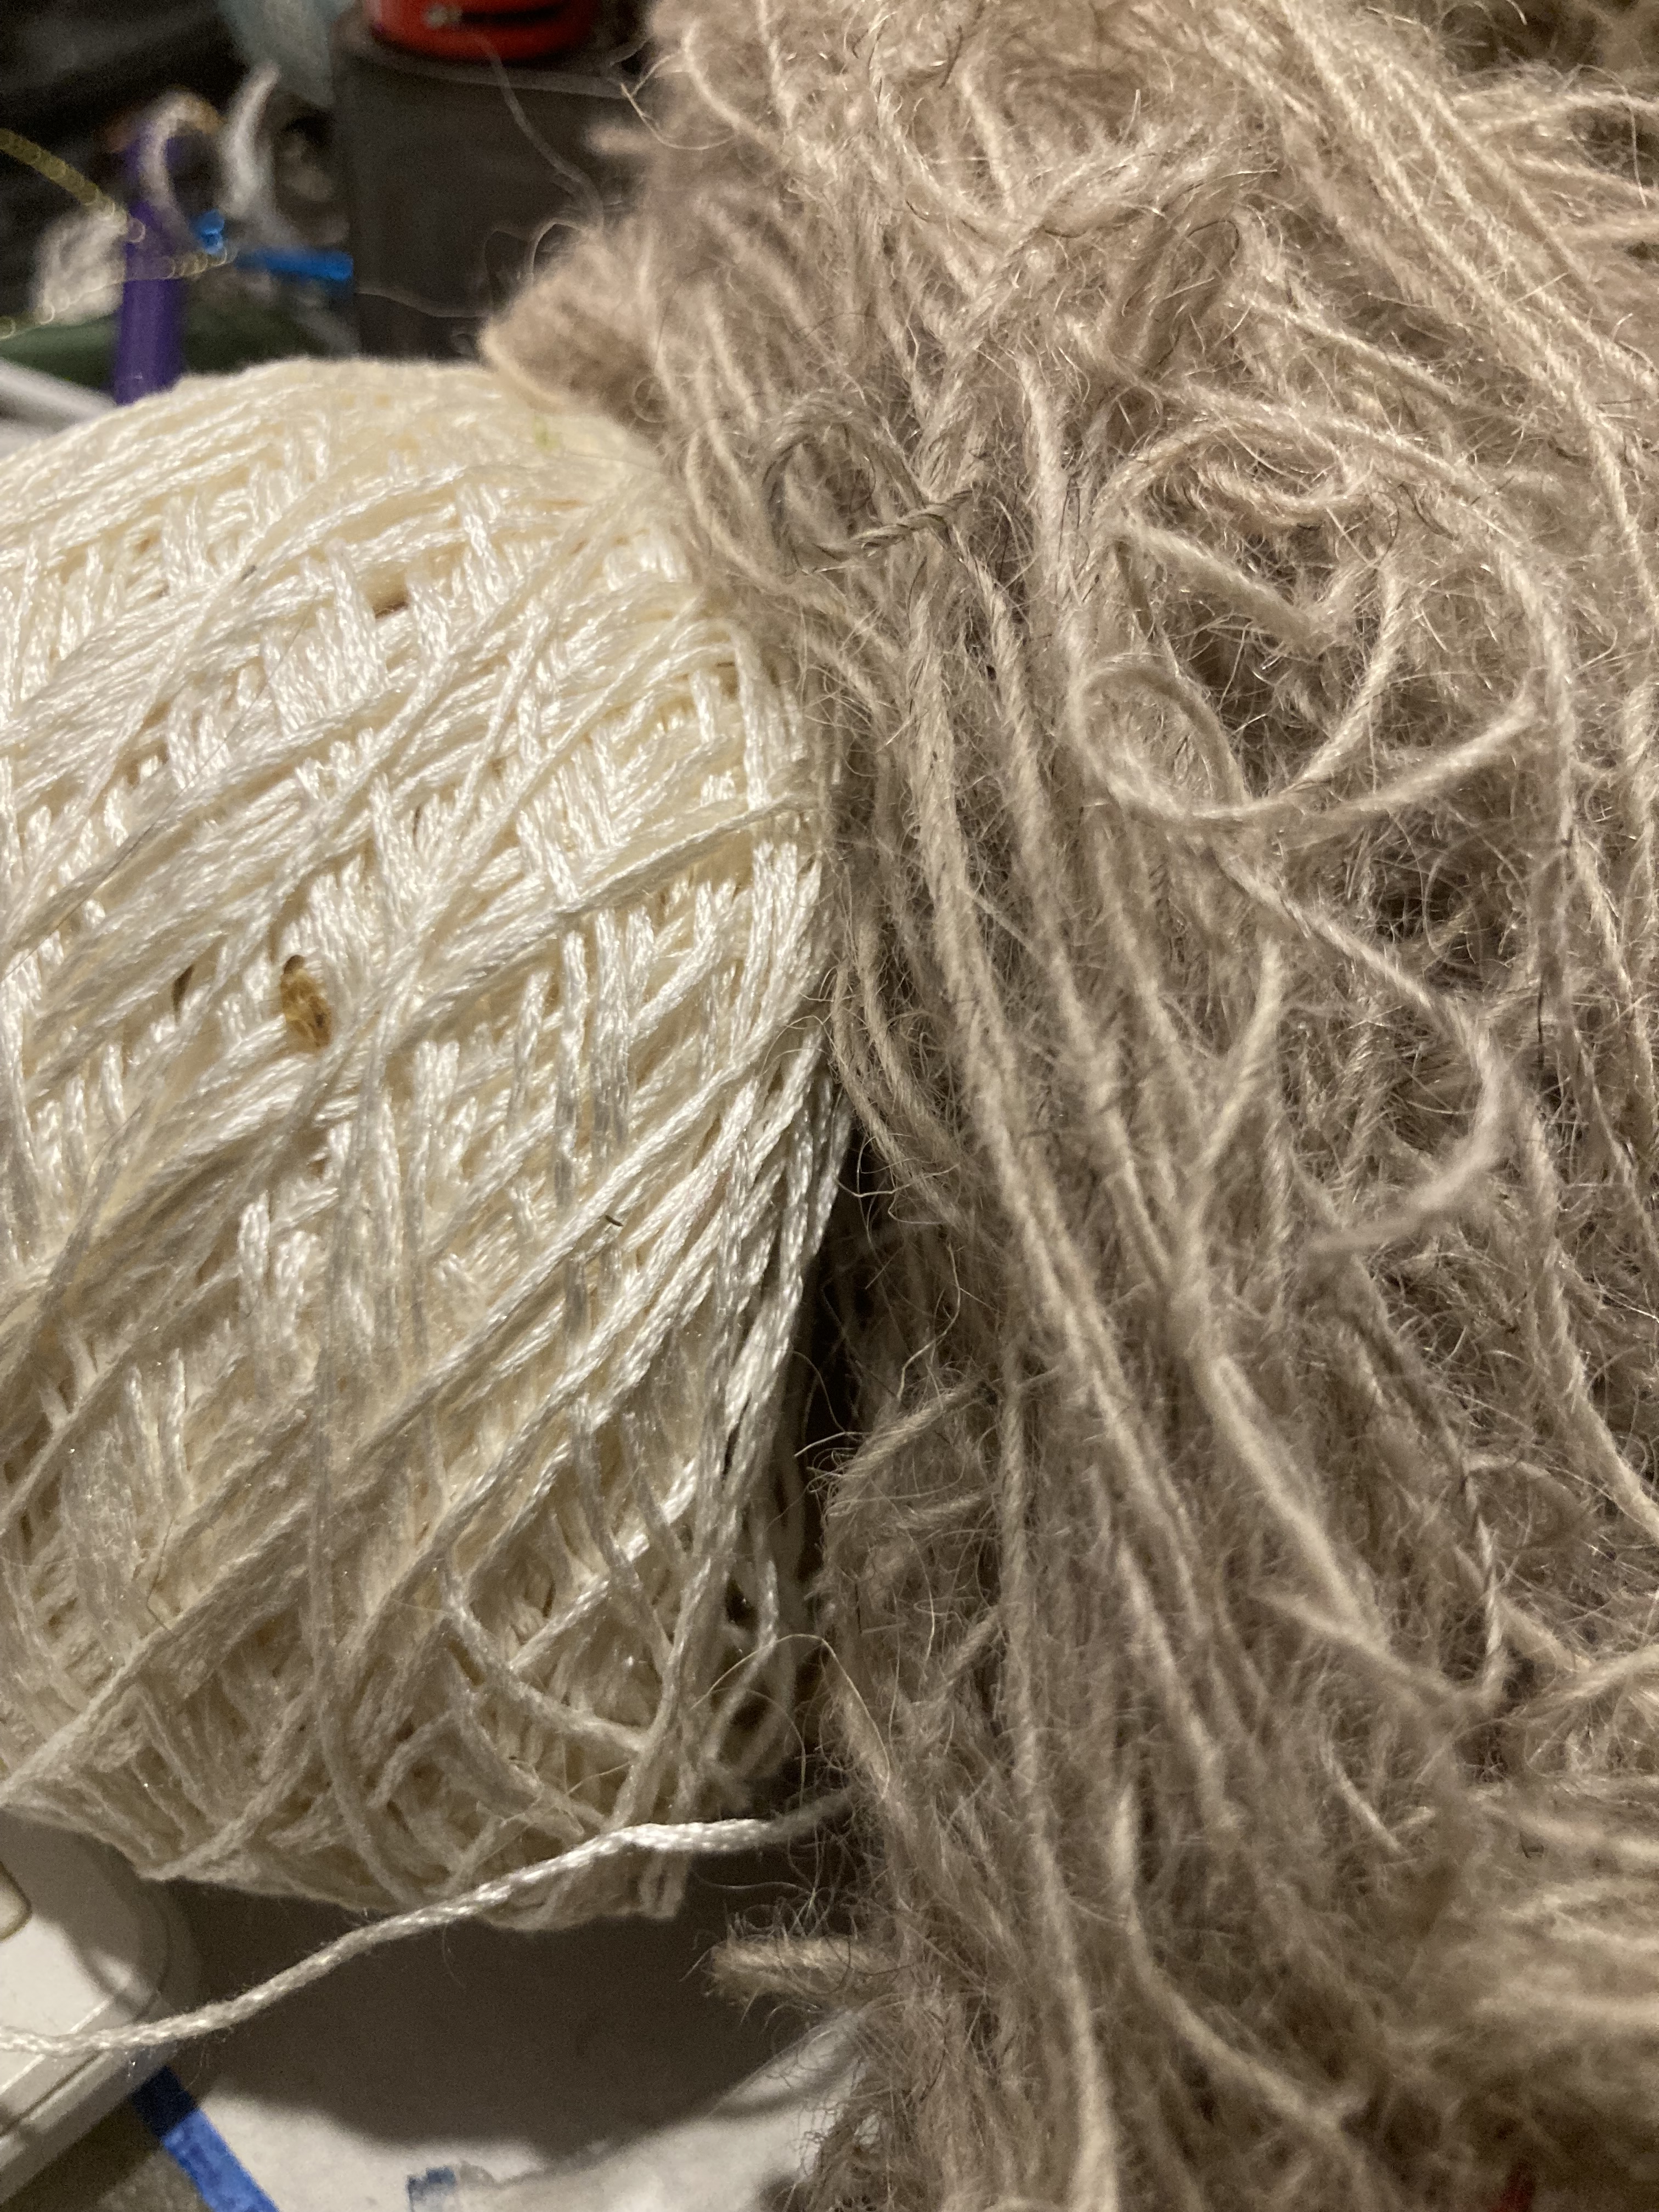
There are a number of ways to cover a button, but the most common and probably easiest one is the woven silk one with ribs.  Not a tabby weave – you can do that too – but a simple round-and-round that gives you a plain ribbed button, which you can then decorate with contrasting thread or pearls or what have you.

Screenshot 2020-05-01 at 3.01.48 PM

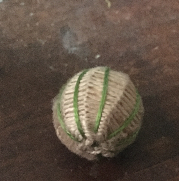
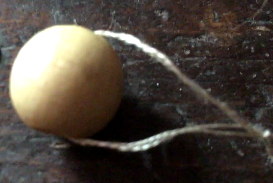
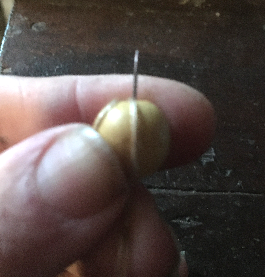
The button is constructed on a plain wooden bead, around a 1/2 inch or whatever size you want.  They can also be oval beads.  I pick up beads whenever I can at the dollar store or wherever.  It doesn’t matter if they are painted or not, since they will be completely covered in thread.   For thread, use fine silk or decent quality embroidery floss – I specify decent quality because it is a pain in the behind when your thread breaks, as the cheaper threads are wont to do.  And you need a needle – any size as long as it is sharp.

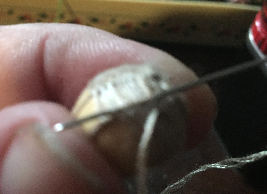
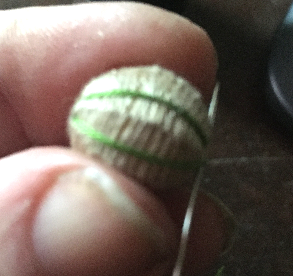
To make the ribs, knot your thread (you want to work with as long a piece of thread as you can stand), thread your needle and run it through the bead.  Then go through the threads just above the knot, to create a loop in which the button is caught.

Screenshot 2020-05-01 at 3.09.47 PM

Pull that loop tight, and go through the middle again – and again, and again, looping the thread around the bead each time.

Screenshot 2020-05-01 at 3.12.34 PM

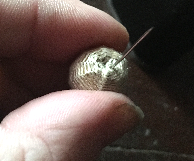
You want seven or eight loops.  Too few and the button won’t cover evenly, too many and you’ll go mad.

Once you’ve got your loops, bring the thread through one more time so it is coming out what we will now call the “top” of the button.  Then lock that thread by putting your needle from right to left under one of those thread loops, and pull it snug.

Screenshot 2020-05-01 at 3.17.41 PM

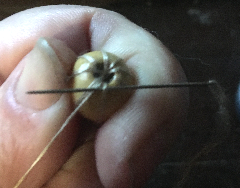
Now you are ready to begin covering the button.  In fact, you’ve already started!  All you have to do is move to the next rib to the right, and again bring your needle under it from right to left.  Make sure your needle comes out OVER your working thread, as in the picture above.  This will help when you come to the second half of the button, where the bead starts getting smaller again,  It’s easy to control your thread and keep it tight when the button is getting wider, as it gets narrower it will  matter very much that your thread is below that needle, trust me on this.

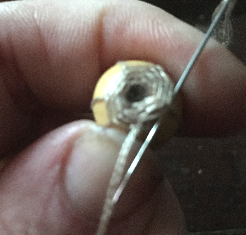
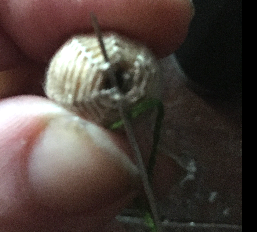
So you just keep going around, moving one rib to the right, and bringing your thread under from right to left each time.  As you go around you can start to see how the threads are beginning to cover:

Screenshot 2020-05-01 at 3.26.05 PM

At least, if you stare really close at this picture, you can see a ridge forming around the hole at the top of the button.  And if you just keep going around and around, it will start to look like this:

Screenshot 2020-05-01 at 3.29.04 PM

You will also notice, as you get more coverage, that while the button is pretty smooth, the “ribs” you’re working around form little bumps in the smooth thread.  That’s ok, you want that.

Screenshot 2020-05-01 at 3.32.22 PM

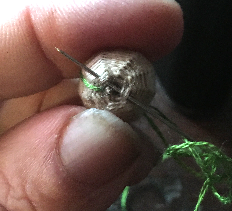
Just keep going.  Now, at some point in this process, you may run out of thread, or have your thread break.  If that happens, it’s easy enough to splice in a new thread.  Just bring the old thread down to the bottom and out of the way, running it alongside the rib that it last went under.  Tie a big knot in a new thread, and bring your needle up from the bottom through the middle of the bead – the knot you tied should catch on some of the threads already running through there, but don’t yank too hard or it’ll pull through.  Just let it catch.

Bring your needle up at the top of the rib you’ve just finished, and then run it down under the worked threads alongside that rib.  It won’t add much bulk, it’ll be fine.  You may have to do this in stages, bringing the needle out and putting it back under again, depending on how far you’ve got around the curve of the bead.

Screenshot 2020-05-01 at 3.39.20 PM

When you get to where your thread ended, come up just above that last thread, as if you’d just wrapped the rib, and continue on to the next rib to the right as before.  As you come around to it, work around both that rib and the old thread running next to it together, and that will bury the old thread in the work.

And that’s it – just keep going until you’ve covered the whole bead.  Which I warn you usually takes about half an hour, so if you’re planning to do a ‘proper’ number of buttons – or even just a few – leave yourself time.  The good news is it’s really easy to do while chatting, or watching TV.

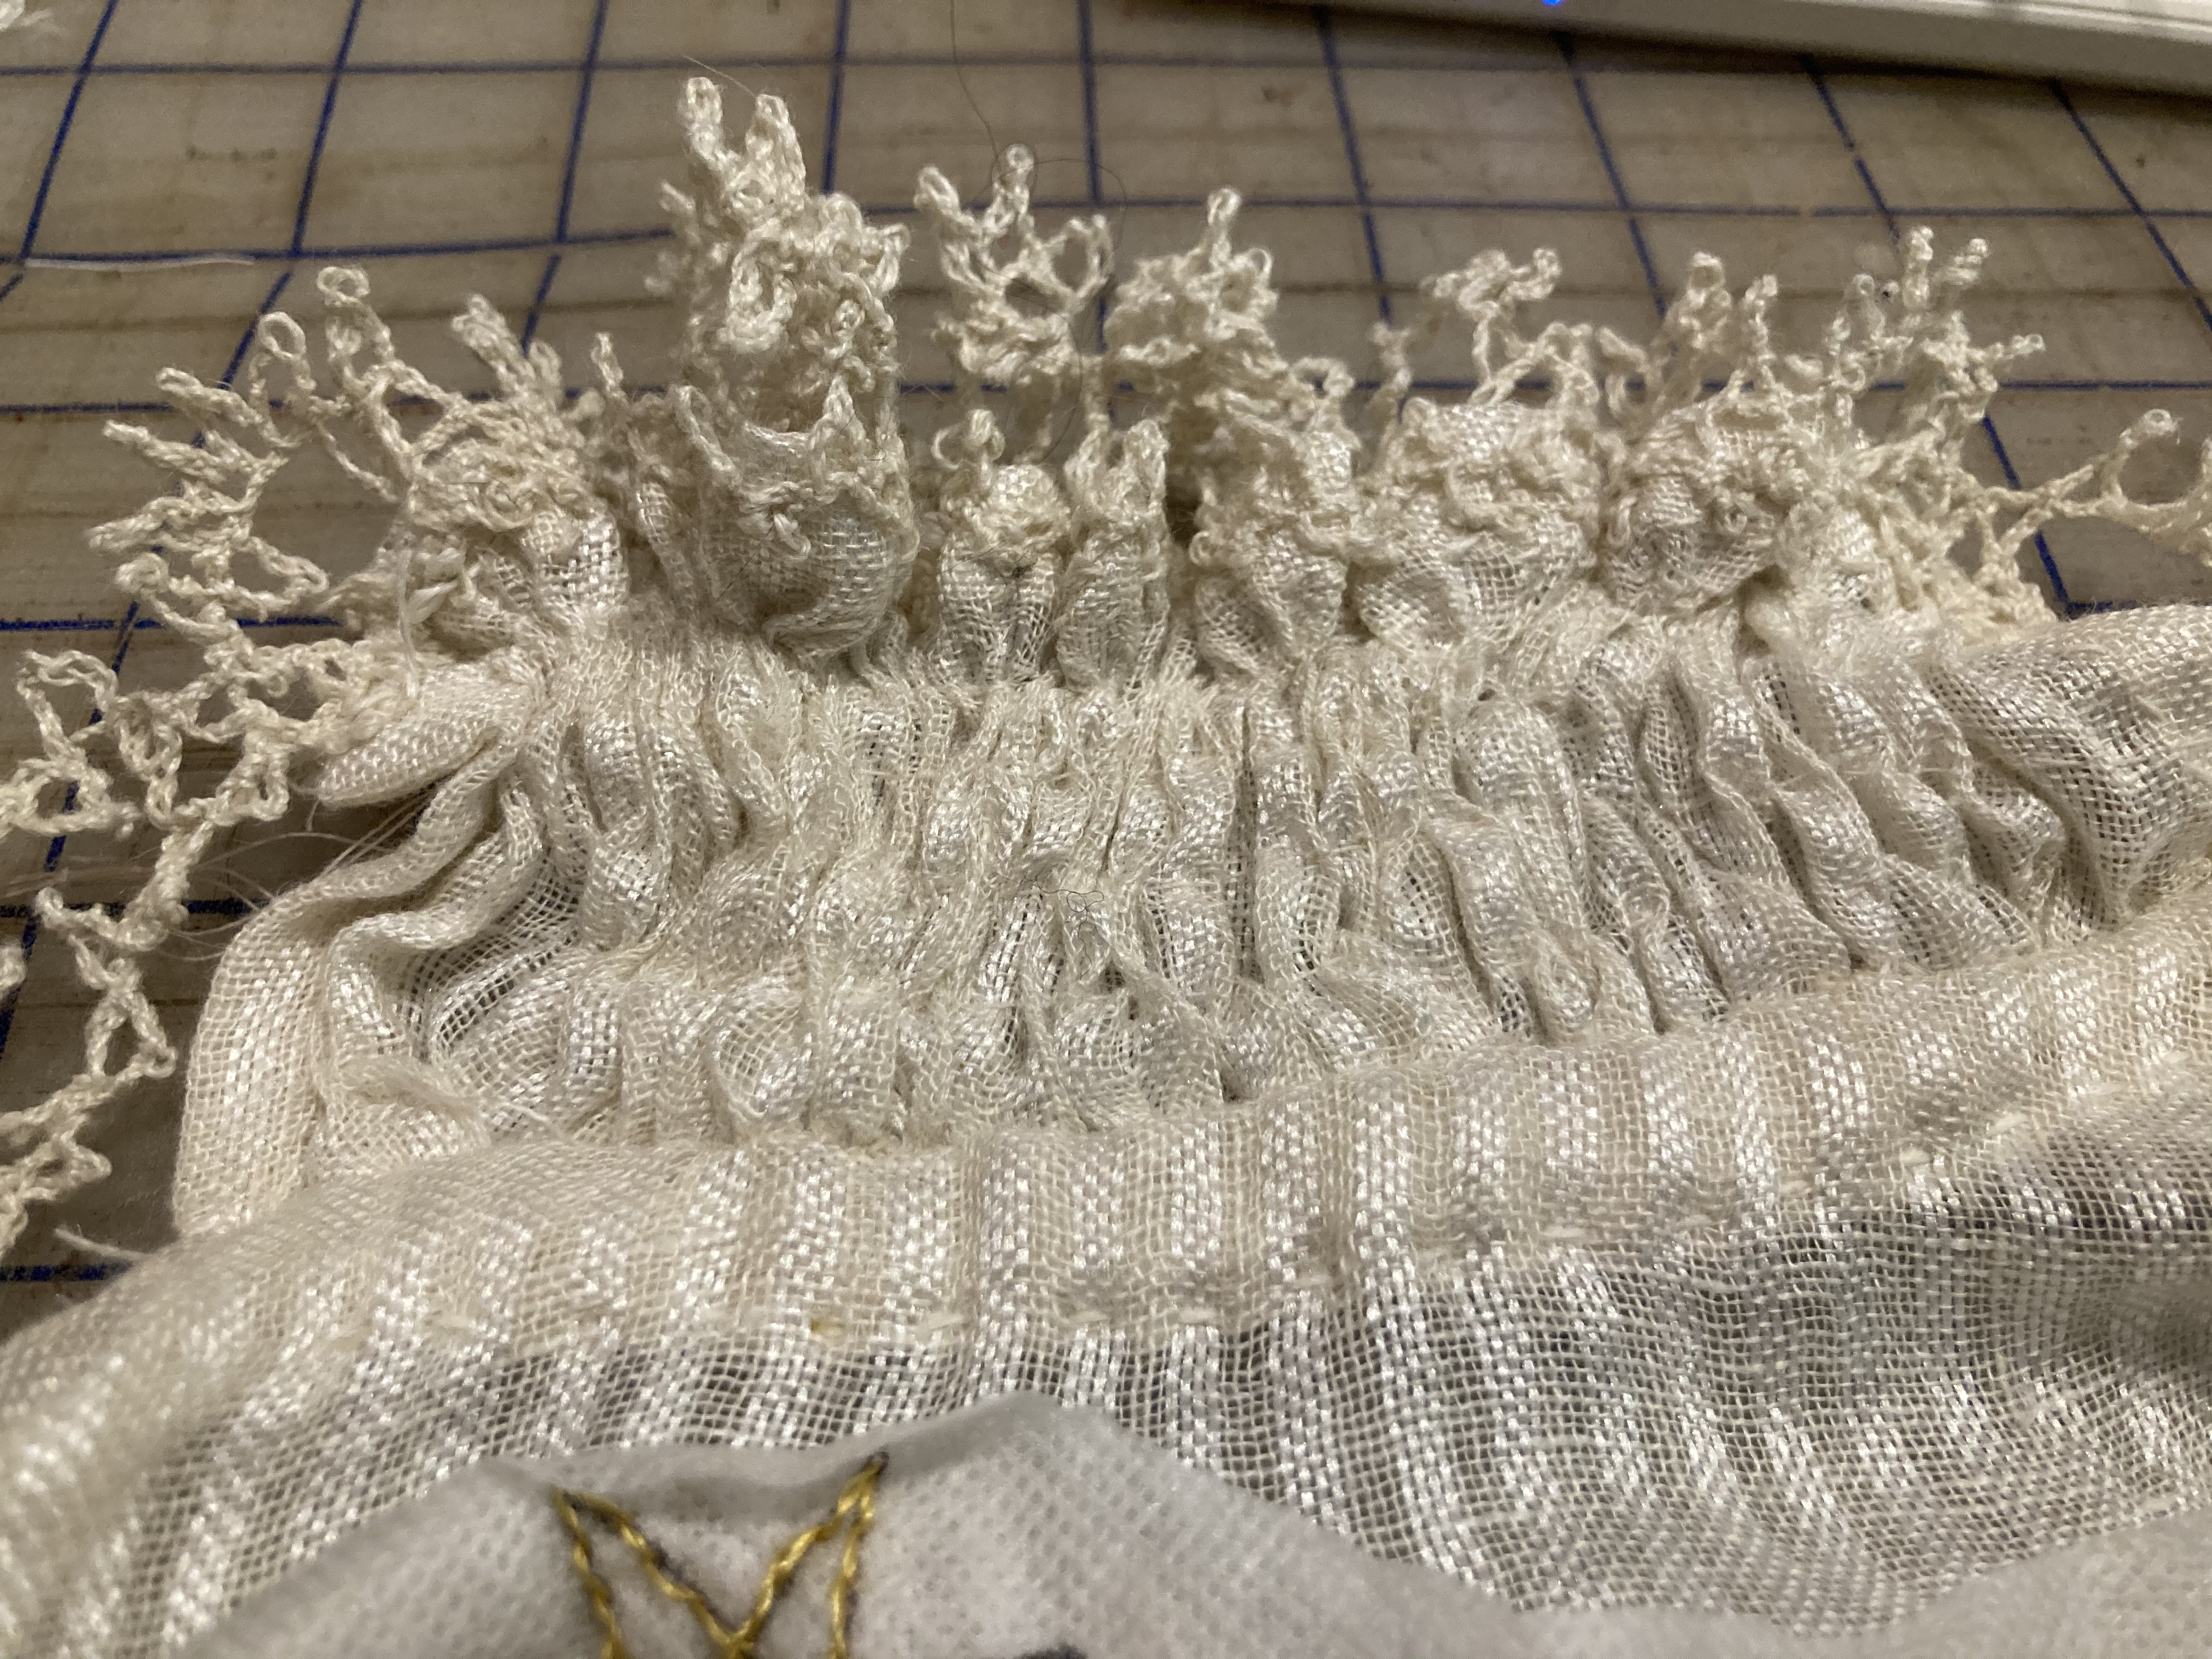
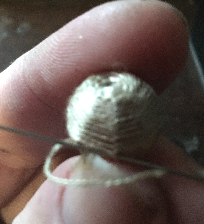
At the end, what you have is this:

Screenshot 2020-05-01 at 3.45.02 PM

Which I agree, is pretty boring looking.  But now you can embroider on it, or wrap it in contrasting thread and it’ll get all dramatic looking.  To wrap it, you can use thicker thread – I didn’t, in these pics, but it actually looks sharper if you do.  Again, tie a knot in your contrast thread and bring it up through the center like you did for splicing – but this tine you want to come up between two of the ribs.

Screenshot 2020-05-01 at 3.49.36 PM

Wrap your thread down the valley between those ribs and pull it nice and snug.  Instead of going through the button again, go across under some of the wraps on the bottom and come up a valley on the other side.  Same thing at the top, go across the top catching it under the threads of the first wrap, and down the nest valley over from where you wrapped it before.

Screenshot 2020-05-01 at 3.54.03 PM

Screenshot 2020-05-01 at 3.55.43 PM

When the valleys each have a thread in them, put your needle through the centre of the button once or twice, burying the end of that thread inside, and just snip it off at the bottom.  It will stay buried.

Screenshot 2020-05-01 at 3.58.45 PM

If you want, you can put a fluffy tuft of thread coming out the top, or stitch a pearl on – that’s what I’m going to do with mine.  Or just leave it as it is, a simple, pretty button.